|
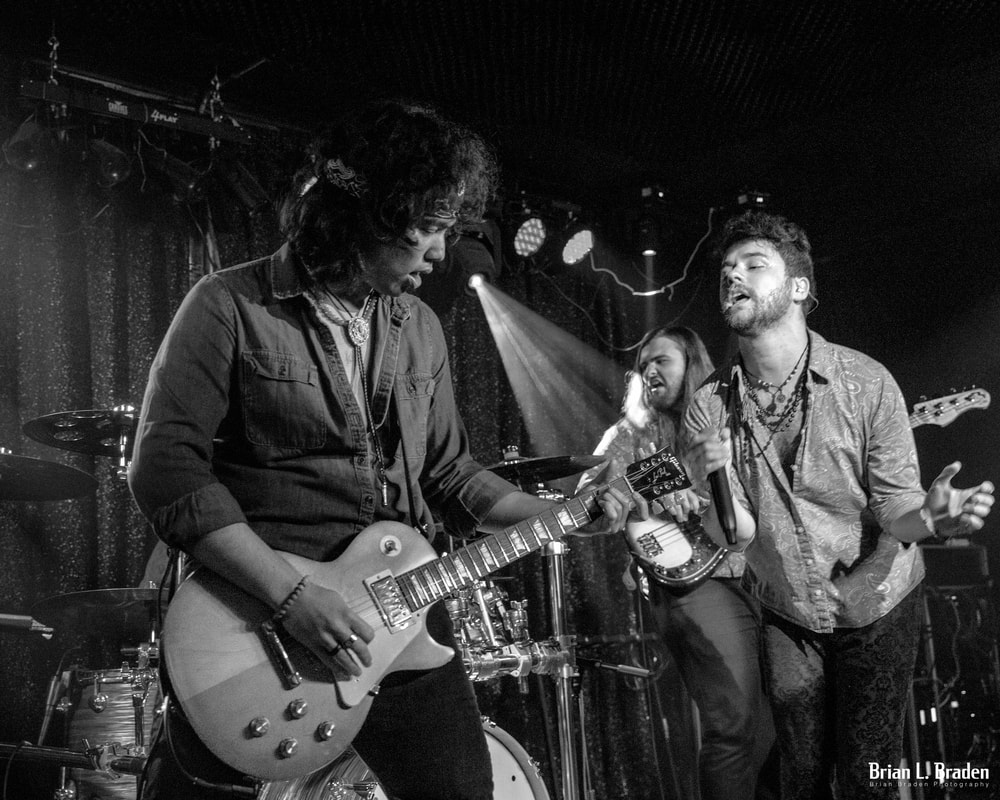
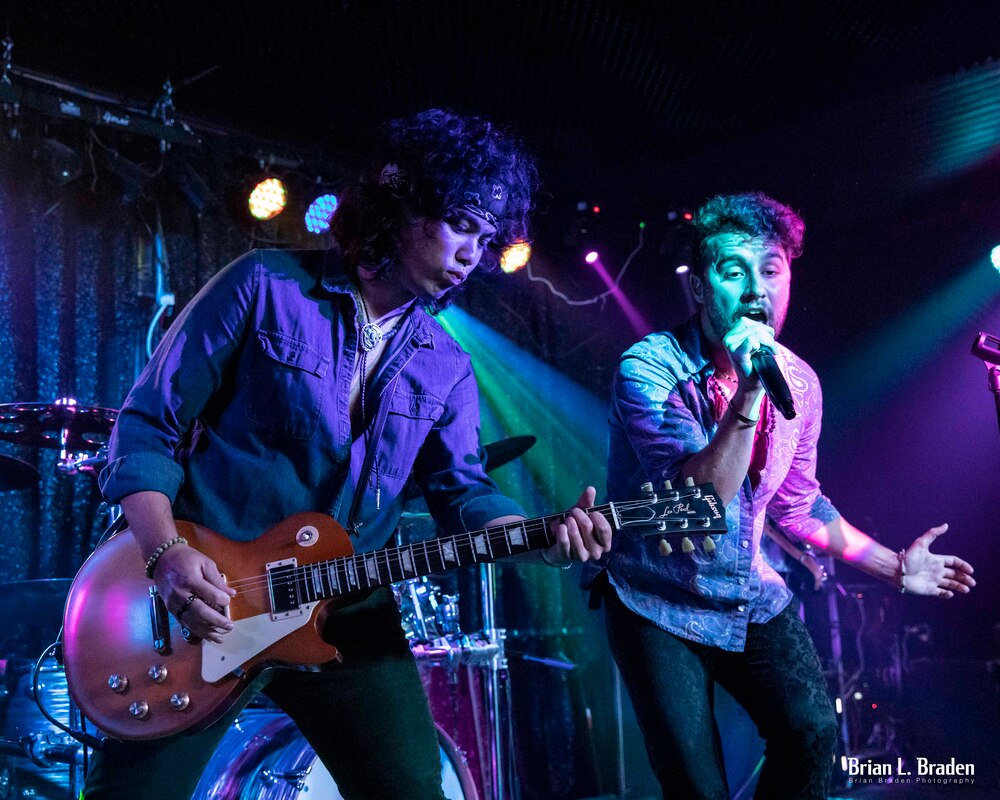
This blog post is for the photography buffs out there. Last weekend I had the honor of taking photos of Temple Monarc, a fantastic L.A.-based band with original music and a classic rock sound. Instead of just showing you some images, I'd like to talk about how I approach live performance photography. I learned photography primarily by taking live music performance images. Due to the dynamic challenges of light, subject and composition, it is a steep learning curve. It is a brutal way to learn the art, and I highly recommend it. Those lessons translate easily to any other genre of photography. I'd like to share some of those lessons-learned today, starting with equipment and settings. Equipment and SettingsEquipment I'm using a Canon 6DM2 with either a EF24-70mm or a EF17-40mm. Any DSLR or mirrorless will work as long as you can shoot on manual. Can you shoot on auto or with a phone? Of course, but you will eventually "peak" in your image quality. Here's why. Shoot on Manual You can't fully exploit the light when the computer does the thinking. There is so much more light the camera captures than what you see "straight out of camera" (SOOC). If you shoot on auto, the computer will either hide or throw that precious light away. Second, try to shoot with post-session editing in mind. When I see a composition, I've learned to see the light as I want it to be, not necessarily how the camera initially captures it and processes it on the display screen. This is where saving your image in RAW format is critical. Aperture I shoot at anywhere from f4 to about f5.6 because I want to strike a balance between low-light capability and reasonable aperture. For fast-moving bands, I don't like a lot of background blur. For slow-moving performers, and setting-dependent, I will go for more background blur. ISO Shoot as low-ISO as possible to reduce noise. Low-light forces higher ISOs, but I detest grainy images unless I intend to go mostly black and white. Low-lit clubs and music venues usually drives me to somewhere between 6400 and 12500 ISO. Shutter Speed I set my shutter speed as high as I can get it, even if that means slightly under-exposing the image. I won't shoot performer on low-lit stages under 1/125s. This keeps blurring down (unless I intend it). One can lessen the impact of under-exposing an image if you shoot with spot or center-weighted light metering. That means taking your light readings from the image cent er or where where your focal-point is. I use either of these settings depending on stage light conditions. I want my light-meter taking the light sample from where I want it, not where the computer thinks it should be. If the background darkens up, so be it. Focal Point Focal-point control is everything in rock & roll photography. Focal point drives composition! Use the smallest AF point your camera will allow, and make sure you understand how to dynamically change your focal-point quickly. If you let the camera control the focal point, you'll throw away a lot of images and miss a lot of great shots. Image Speed Set your camera to take multiple images at the highest speed. Also, make sure your data card is clear and ready for lots of images. All of this is important because of rock and roll. These settings give me maximum control of light and composition, and result in the best post-session editing options. Now, lets take a look at them in action. ApplicationThese two images were taken 30 seconds apart, yet that 30 seconds changes how each image was edited. In the first image, I chose black and white, yet in the second image I chose color. Why?
Subject & CompositionSubject and composition are directly tied to focal point. In both of these images I set up my focal point on my viewer's far right, with the intent of using the vocalist as my subject. Specifically, I am following the singer's left eye in both images. Based on my camera settings, the singer is the subject, I've automatically framed my composition, and light meter is reading the light reflecting off the singer's face. FOCAL POINT ANCHORS YOUR SHOT. Rule of thumb: The lower the light, the lower the aperture, and therefore the tighter the focal point. In image 1, composition and contrast are most important, so I selected black & white to accentuate this. In this instance, structure and subject interplay trumped color. Do you see all the triangles and arrows in Image 1? The bass player is visible behind the vocalist. The three performers heads form a triangle. Both he and the singer are facing the guitarist, who is looking at his guitar neck, which is pointed right at the lead singer (triangle) If you draw a line from the top of the singer's head to the bass player's head, it forms a line that points at the guitar (triangle) which points right back to the lead singer (arrow). If you look at the bassist's instrument, it protrudes from behind the singer on a straight line, as if the vocalist is being pierced (arrow) by the guitarist. The singer is looking at the guitarist's face, who is looking at his guitar, which points right back to lead singer (triangle). Now, look at the spotlight. It is simultaneously a triangle and an arrow piercing all the other triangles, and pointing at the center of all of Image 1's triangles - the guitarist's left hand. Leaving Image 1 in color, with all the different colored lights, would have been distracting. The image draws its power from composition, not color. Image 2 has a far simpler composition. Here, we have only one triangle. The guitar forms the base, and the performer's heads point to the apex. The bass player is hidden, and the image is uncomplicated, and color does not distract. LightIn Image 1, the lead singer's face is fully in the blue-green spot-light. Behind him, the bass player is visible, he is facing us, and his light source is the same color, and close in illumination, to that bathing the singer's face. Therefore, the camera handles the white balance for both performers the same. When converted to black and white, the two performers' faces will handle editing identically. The guitarist, however, is getting different light and the light metering is not "seeing" him. Therefore, he's darker. He is also dressed in a color similar to the stage lighting and blends in, but his guitar is more reflective and has a higher albedo. By going black and white, his guitar "pops" and forms a high-contrast bottom for several of the composition triangles. Bottom line, I get more bang for my editing buck for Image 1 in B&W, and Image 2 works as-is. EditingIn post-production editing, it quickly became clear Image 1 would have far more impact as black and white. Using the BW Mixer in Photoshop Camera Raw, I can covert colors into contrast. By increasing illuminance on aquas and blues, I can make the singer and bass player's faces brighter, as I can with the reds in the lead guitar. This reinforced the composition triangles and gives the image more clarity. Image 2 needed almost no editing, other than a change from 6x4 to 8x10. SummaryTwo images, 30 seconds apart. Same subject, same focal point, same settings, and two entirely different outcomes. I hope you enjoyed this week's blog. #photography #photo #camera #photoediting #photoshop #music #musicphotography Please join me on my journey. If you enjoyed this blog, please like the post and leave a comment or if you're feeling brave, share it on social media. This platform is my entire advertising budget and is how I share the word on my books. Also visit my Facebook, my author page and check out my fiction books here book here.
0 Comments
Your comment will be posted after it is approved.
Leave a Reply. |
Archives
July 2023
Categories
All
|
 RSS Feed